


The architectural differences between the root account and sudo delegation, how the SUID bit works, why visudo saves production servers, and how to manage privileges safely. When you first start working with Linux, you run into permission errors constantly. You try to update your packages, edit a web server config, or mount a hard drive, and the terminal immediately pushes back: sudo apt update [ sudo ] password for asep: Hit:1 http://archive.ubuntu.com/ubuntu jammy InRelease Get:2 http://security.ubuntu.com/ubuntu jammy-security InRelease [ 110 kB] ... Fetched 110 kB in 1s ( 115 kB/s ) Reading package lists... Done You type your password, the command works, and you move on. Soon, you start hearing people use "root" and "sudo" interchangeably. Some engineers tell you to log in as root to get things done faster. Others tell you that logging in as root is a dangerous mistake that will get you fired from a sysadmin job. Are root and sudo just two different names for the same administrative superpower? The short answer is no. Root is an identity with total power over the entire operating system. Sudo is a tool that temporarily grants specific administrative privileges to regular users under strict rules. Understanding the difference between the two is one of the most critical steps in mastering Linux administration and securing production infrastructure. Let's break down how root and sudo work under the hood, how they differ, and why modern systems rely on sudo for everyday operations. 1. What is Root in Linux? In Linux and Unix-like operating systems, root is the default superuser account. Every user on a Linux system is identified by a numerical identifier called a User ID (UID) . Normal user accounts usually start at UID 1000 on modern distributions like Ubuntu, Debian, Red Hat, and Fedora. System service accounts (like www-data , nginx , or systemd-resolve ) get lower UIDs between 1 and 999. The root user always has UID 0 and GID 0 (Group ID 0). rm -rf /tmp / old-app-data/ Notice the accidental space between /tmp and / . A normal user shell will fail when trying to delete / because a regular user does not own the root filesystem. If you run that exact same typo while logged in as root: # rm -rf /tmp / old-app-data/ The shell begins deleting every file on the system starting from the root directory / . Within seconds, critical system binaries, libraries, and configurations are erased, crashing the server beyond repair. 2. What is Sudo? The name sudo originally stood for superuser do . Today, it is more commonly described as substitute user do . Sudo is not a user account. It is an executable binary program located at /usr/bin/sudo . Instead of giving you a permanent superuser identity, sudo acts as a secure gateway. It allows an authorized regular user to run a specific command with elevated privileges (usually root privileges) without switching accounts or sharing root credentials. Here is what happens when you run a command with sudo : sudo systemctl restart nginx [ sudo ] password for asep: User Identity Check: Sudo identifies who is running the command (user asep ). Policy Verification: Sudo reads its configuration file ( /etc/sudoers ) to check if asep is allowed to run /usr/bin/systemctl restart nginx on this host. Authentication: If authorized, sudo prompts for asep's personal password , not the root password. Elevation & Execution: Sudo launches the command with effective UID 0 (root). Auditing: Sudo writes a permanent log entry to the system audit logs recording who ran what command, when, and from which directory. Privilege Drop: As soon as systemctl finishes running, the elevated privileges are gone. Your shell returns to your standard unprivileged user account. The Sudo Credential Cache Typing your password for every single administrative command would get frustrating quickly. Sudo solves this with a configurable timestamp cache. By default, once you successfully authenticate with sudo, it creates a secure credential ticket valid for 15 minutes . During those 15 minutes, you can run additional sudo commands without re-entering your password. Every time you run another sudo command within the window, the 15-minute timer resets. If you step away from your desk and want to clear the credential cache immediately for security, you can invalidate the ticket manually: sudo -k The next time you type sudo , you will be prompted for your password again. 3. How Sudo Gets Root Powers: The SUID Bit Have you ever wondered how a regular user can run /usr/bin/sudo and suddenly gain root permissions to inspect system files or restart services? The secret lies in a special Linux permission called the SUID (Set User ID) bit. Let's inspect the /usr/bin/sudo binary using ls -l : sudo visudo visudo opens the configuration file in a safe temporary lockfile. When you save and attempt to exit, visudo parses the syntax. If it detects an error, it refuses to save, warns you of the exact line number, and gives you a chance to fix the mistake before it touches the real /etc/sudoers file. Understanding Sudoers Syntax The basic syntax of a rule in /etc/sudoers follows this format: who where = (as_whom) what Let's look at the default rule found on most Ubuntu and Debian systems: %sudo ALL=(ALL:ALL) ALL Let's break down what each piece means: %sudo : The % symbol means this rule applies to a group rather than a single user. Anyone in the sudo group gets these permissions. (On Red Hat and CentOS, the group is named %wheel ). ALL= : The first ALL defines the network hosts where this rule applies. ALL means this rule works on any hostname or machine. (ALL:ALL) : The targets in parentheses define who the user can run commands as. The first ALL means any user (including root); the second ALL means any group. ALL : The final ALL specifies which commands the user is allowed to run. ALL means any executable binary on the system. Creating Granular Permissions for Team Members In real-world teams, you often want junior engineers or developers to manage specific services without giving them full system access. Using sudo visudo , you can add safe, targeted rules at the bottom of the file (or inside /etc/sudoers.d/developer-rules ): # Allow developer asep to restart web services and check logs asep ALL=(ALL) /usr/bin/systemctl restart nginx, /usr/bin/systemctl reload nginx, /usr/bin/journalctl With this rule in place, user asep can run: sudo apt install htop Sorry, user asep is not allowed to execute '/usr/bin/apt install htop' as root on webserver01. The attempt is immediately blocked and logged to the security audit trail. Granting Commands Without Password Prompts For automated deployment scripts or monitoring agents, you can use the NOPASSWD tag so background automation can run specific checks without hanging on an interactive password prompt: # Allow backup user to run rsync as root without a password backupuser ALL=(root) NOPASSWD: /usr/bin/rsync 6. Demystifying su, su -, sudo -s, and sudo -i One of the most confusing areas for Linux users is the alphabet soup of shell-switching commands: su , su - , sudo -s , and sudo -i . While they all give you an administrative root prompt ( # ), they behave very differently behind the scenes. Let's break down each one. 1. su (Switch User) su stands for switch user . When run without arguments, it defaults to switching to the root account. su Password: # Password required: The root account password . Environment: It switches your user ID to root, but it preserves your current user's environment variables , including yourPATH , PATH , you might accidentally execute binaries from unprivileged user directories. 2. su - (Switch User with Full Login Shell) Adding the hyphen ( - or -l / --login ) tells su to launch a completely fresh login shell . su - Password: # pwd /root Password required: The root account password . Environment: It completely discards your old environment. It loads root's .bash_profile , setsHOME to /root , initializes root's clean system SHELL variable (or the shell listed in /etc/passwd ) with elevated privileges. sudo -s [ sudo ] password for asep: # Password required: Your personal password . Environment: It runs with root privileges, but retains much of your original user environment and stays in your current directory. Use case: Quick root tasks where you want to keep your current terminal location and session variables. 4. sudo -i (Sudo Login Simulation) sudo -i simulates an initial login to the root account using sudo permissions. sudo -i [ sudo ] password for asep: # pwd /root Password required: Your personal password . Environment: It completely re-initializes the environment just like su - . It loads /root/.profile and /root/.bashrc , changes the working directory to /root , and sets root's standard system path. Standard use: This is the recommended modern way to get a full interactive root session when performing major system maintenance, without ever needing to know or enable a master root password. 5. sudo -u (Running as Another User) Sudo is not just for root. You can use the -u flag to run commands as any service account on the system. For example, when managing PostgreSQL databases, you should run commands as the postgres user: sudo -u postgres psql psql ( 14.11 ) Type "help" for help. postgres = # Or running a git maintenance task as the www-data web server account: sudo -u www-data whoami www-data This prevents file ownership issues and ensures files created by service accounts are not accidentally owned by root. 7. Common Traps and Gotchas with Sudo Even experienced engineers run into these common sudo gotchas. Let's look at why they happen and how to solve them cleanly. Gotcha 1: The Shell Redirection Trap You want to append a new setting to a protected system file, so you run: echo "vm.swappiness=10" | sudo tee -a /etc/sysctl.conf tee runs with elevated privileges, reads from standard input, and writes directly to the protected file while also showing the output in your terminal. Use -a to append instead of overwriting. Alternatively, execute the entire pipeline inside a subshell: sudo ll /var/log sudo : ll: command not found By default, bash does not expand aliases for the arguments passed to commands. Sudo looks for an actual binary program named ll on your disk and cannot find one. The Solution: The Trailing Space Alias Trick Add this single line to your ~/.bashrc : alias sudo = 'sudo ' In bash, if the value of an alias ends with a space, the shell checks the next word on the command line for alias expansion as well. Once you add that trailing space, sudo ll will properly expand ll into ls -lah before running! Gotcha 3: The Dangerous Habit of "sudo su" You often see tutorials tell users to type: sudo -i sudo -i properly initializes the environment and avoids spawning nested authentication layers. 8. Auditing and Security Logs One of the biggest advantages of sudo over direct root logins is the audit trail. Whenever a user executes a command with sudo, Linux records the transaction. On Debian and Ubuntu systems, authentication logs are stored in /var/log/auth.log . On Red Hat, Fedora, and Rocky Linux, they are stored in /var/log/secure . On modern systemd systems, you can view them with journalctl . Let's inspect what a sudo log entry looks like: $ sudo journalctl -u sudo -n 5 --no-pager Output: Aug 20 14:15:02 webserver01 sudo[18492]: asep : TTY=pts/0 ; PWD=/home/asep ; USER=root ; COMMAND=/usr/bin/systemctl restart nginx Aug 20 14:18:22 webserver01 sudo[18530]: asep : TTY=pts/0 ; PWD=/var/www/html ; USER=root ; COMMAND=/usr/bin/vim index.html Aug 20 14:22:10 webserver01 sudo[18604]: johndoe : user NOT in sudoers ; TTY=pts/1 ; PWD=/home/johndoe ; USER=root ; COMMAND=/usr/bin/cat /etc/shadow Look at the valuable information in every single line: Timestamp and Hostname: When and where the event occurred ( Aug 20 14:15:02 webserver01 ). Invoking User: The exact individual user who ran the command ( asep ). TTY and Working Directory: The terminal session and directory path ( TTY=pts/0 , PWD=/home/asep ). Target User: Who they ran the command as ( USER=root ). Exact Command: The exact binary and argumen
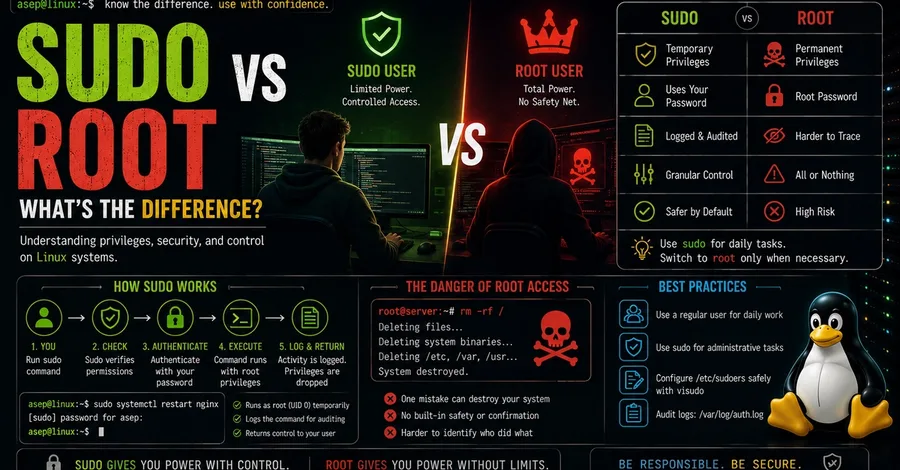
Sudo vs Root: What's the Difference?
Asep Sayyad